
Installation Guide
At Selegna, we’re committed to ensuring that your experience with our products is as seamless as possible. On this page, you’ll find a step-by-step installation guide along with troubleshooting tips to help you get the most out of your backlit address numbers.
Safety Information
- Electric Safety: Always turn off the power at the source before starting installation to prevent electrical shock.
- Handling: Wear protective gloves to handle materials safely and avoid potential injury.
- Installation Safety: Use the correct tools and methods as specified to ensure secure installation.
Watch Our Step-by-Step Installation Video for Backlit House Numbers
Solar power option
Transformer Option
Package Contents
- 1 x Custom House Number(s)
- 1 x House Number Paper Template
- Threaded Studs for Each Number (Plastic and Metal)
- 1 x 24V Solar Panel or 1 x 24V LED Transformer
- Remote Control and Mounting Parts
- Backboard (If Selected)
- Extension Wire for the Numbers (6.5 Ft)
- Wire Connectors
- Timer for the LED Transformer
Tools and Materials Needed
- Marker or Pencil: For marking drill holes.
- Masking Tape: To secure the template during marking.
- Drill with 5mm & 10mm Drill Heads: For making holes for mounting and cable routing.
- Level or Tape Measure: To ensure alignment and even placement.
- Wire Cutter/Stripper: For preparing electrical connections.
- Anchor Bolts (if necessary): Depending on the type of exterior wall surface.
- Block of Wood and Rubber Mallet (optional): For securing the numbers flush against the wall.
- Silicone Glue (optional): For additional securing of the numbers.
Installation Instructions
Installation Steps Straight Onto a Wall/Pillar
1: Unboxing: Remove all contents carefully. Place numbers on a soft cloth to avoid scratches.
2: Cleaning the Surface: Clean the wall or pillar where the numbers will be mounted.
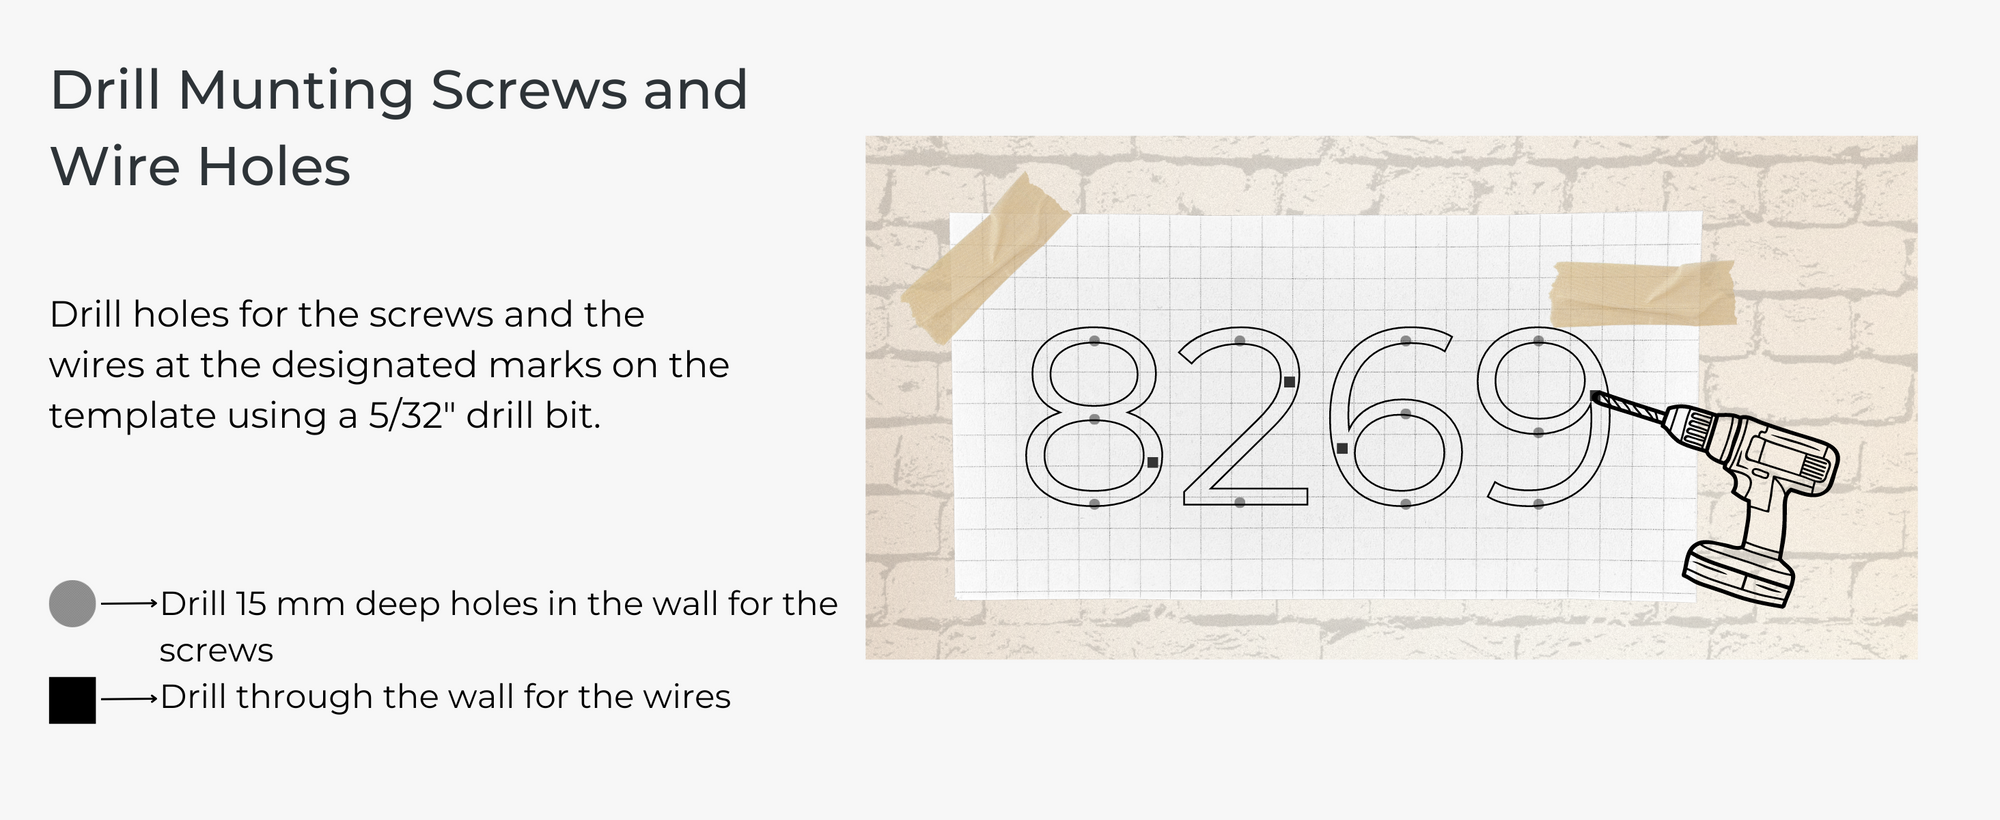
3: Marking for Drill Holes: Position the paper template on the wall. Use a marker to mark through the template where the threaded rods and cable will go.
4: Securing the Template: Tape the template firmly in place. Drill holes at the marked spots—5mm for the rods, 10mm for the cable.
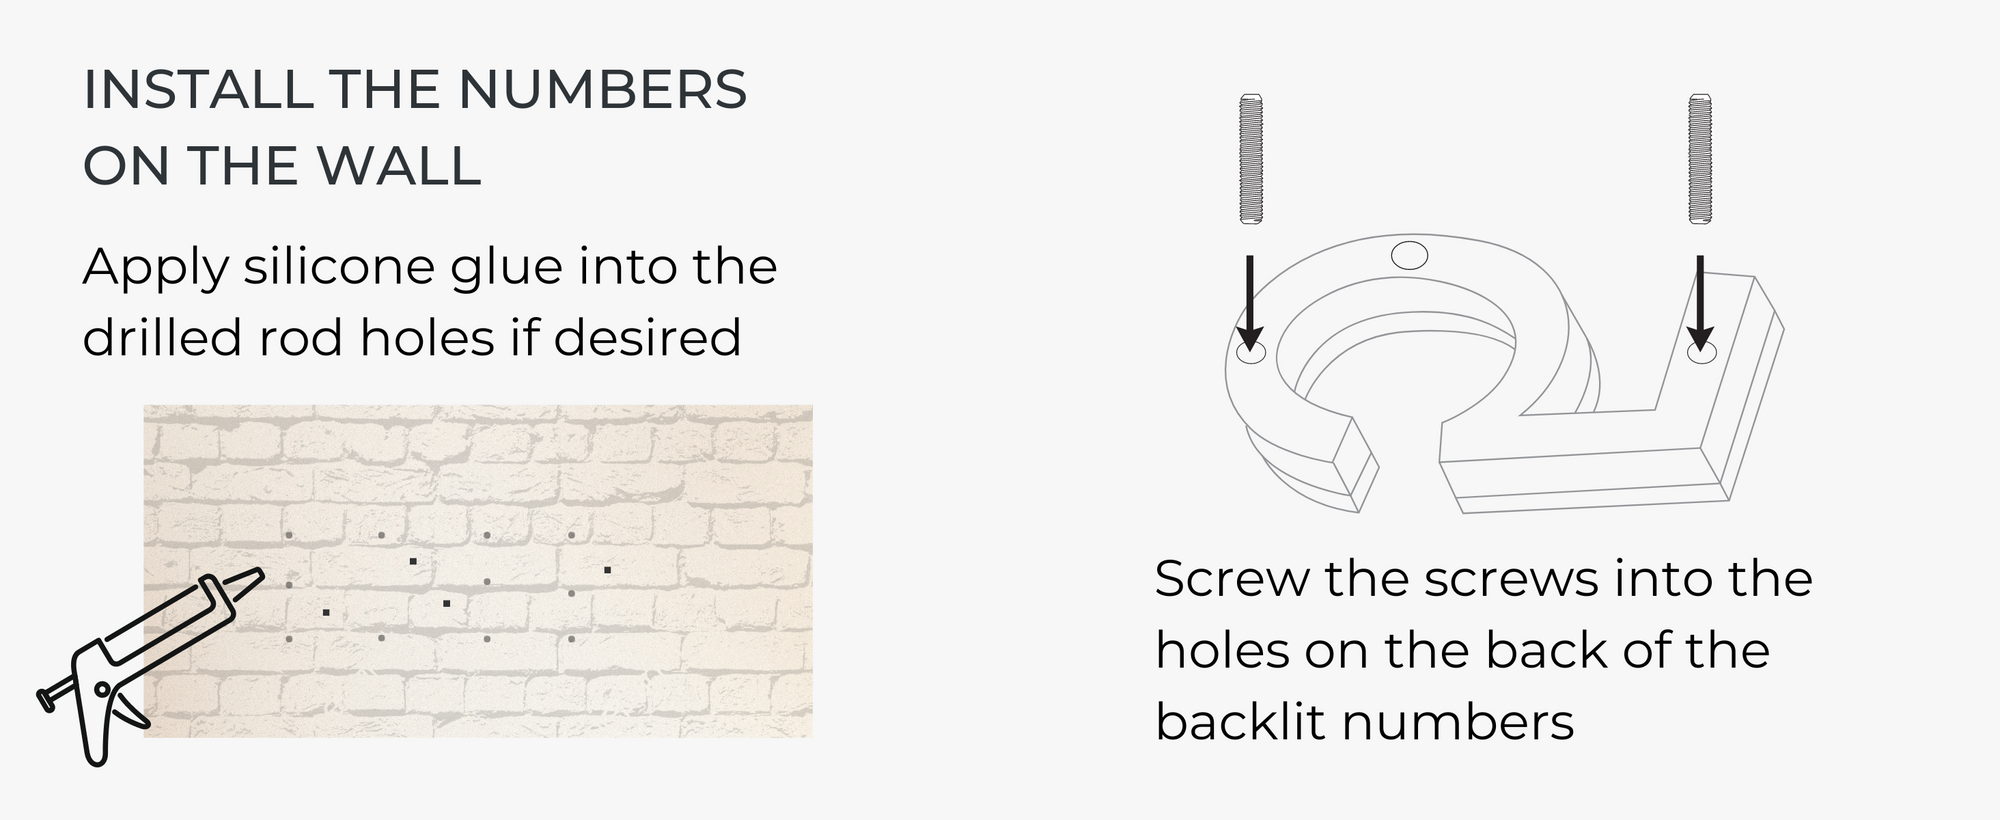
Attaching the Numbers
Screw the threaded studs into the back of the numbers. Apply silicone glue into the drilled rod holes if desired, and insert the rods. Route the electrical cable through the 10mm hole.
Place onto the wall and push into the final position
Push the threaded studs connected to the numbers into the holes where the silicone glue has been applied. Thread the cable attached to the numbers through the 10mm hole, ensuring it can reach the power supply.
Connecting to the Solar Panel Power Source
1: Preparing Wires: Cut wires to the needed length, ensuring enough slack for connections, and strip ½ inch of insulation from each end.
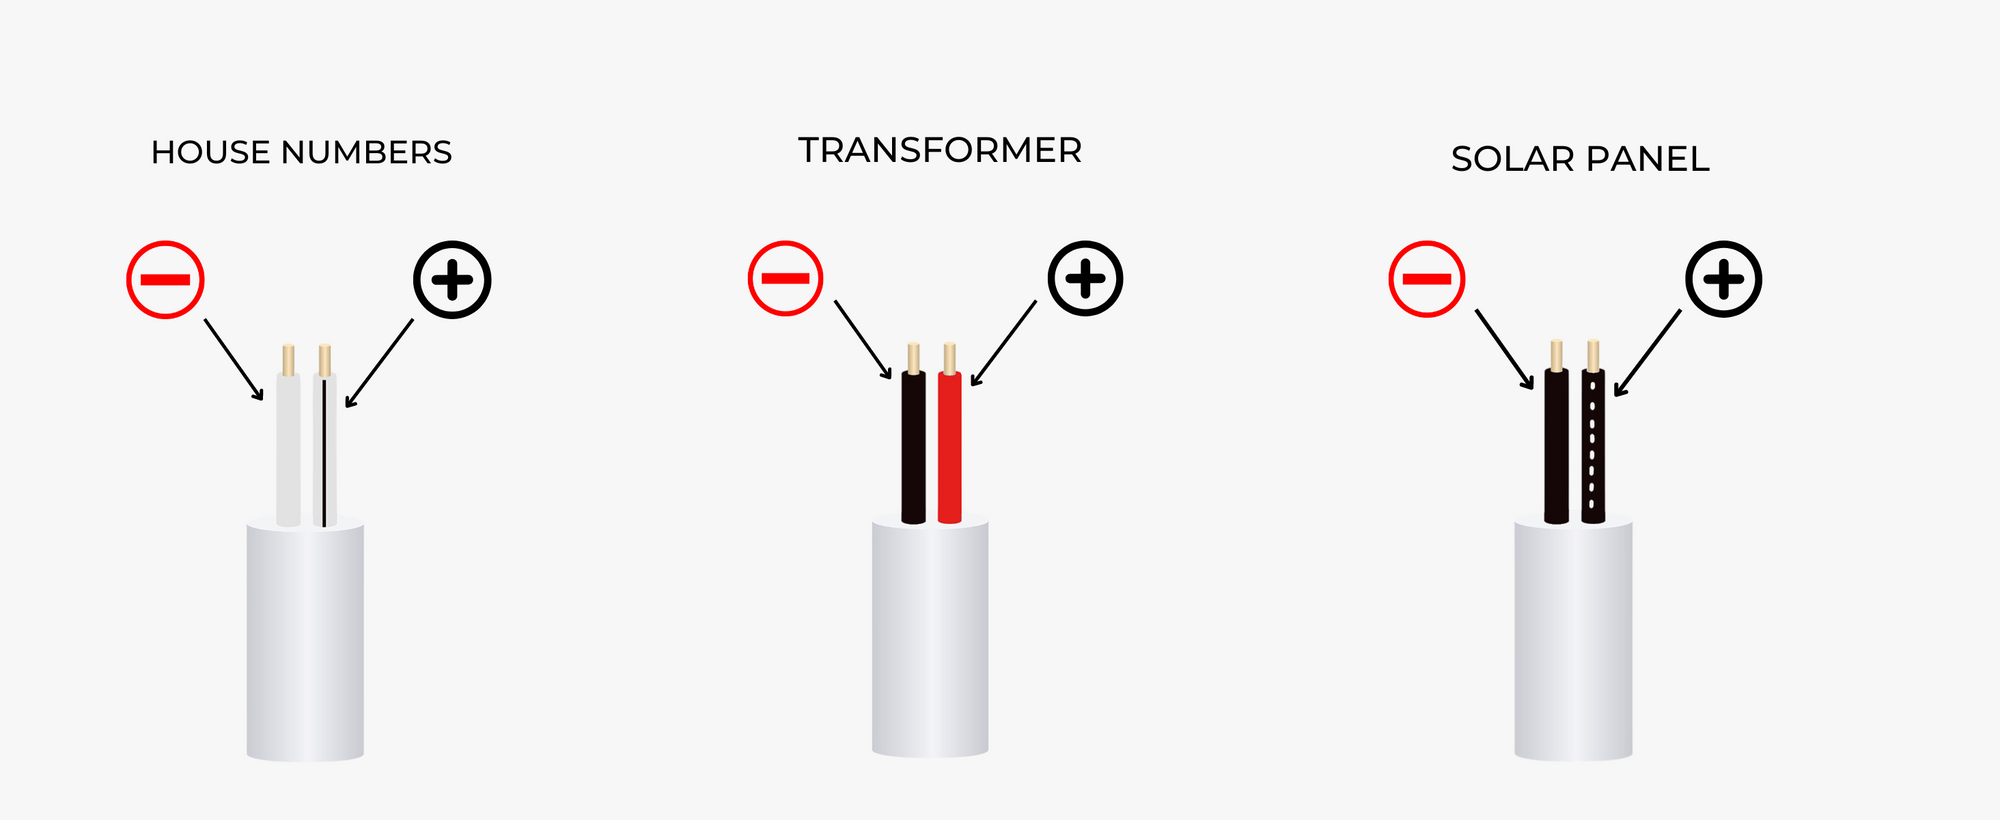
2: Identifying Wires: For the house numbers, the grey wire with a black stripe is positive, and the white wire is negative. For the solar panel, the black wire with white dots is positive, and the solid black wire is negative.
3: Making Connections: Connect all grey wires to the positive terminal, and all white wires to the negative terminal. Use wire connectors to securely insulate the connections.
4: Installing the Solar Panel: Position the solar panel stake in a location that receives direct sunlight for optimal charging. Connect the house number wires to the panel according to the provided connectors.
solar panel features
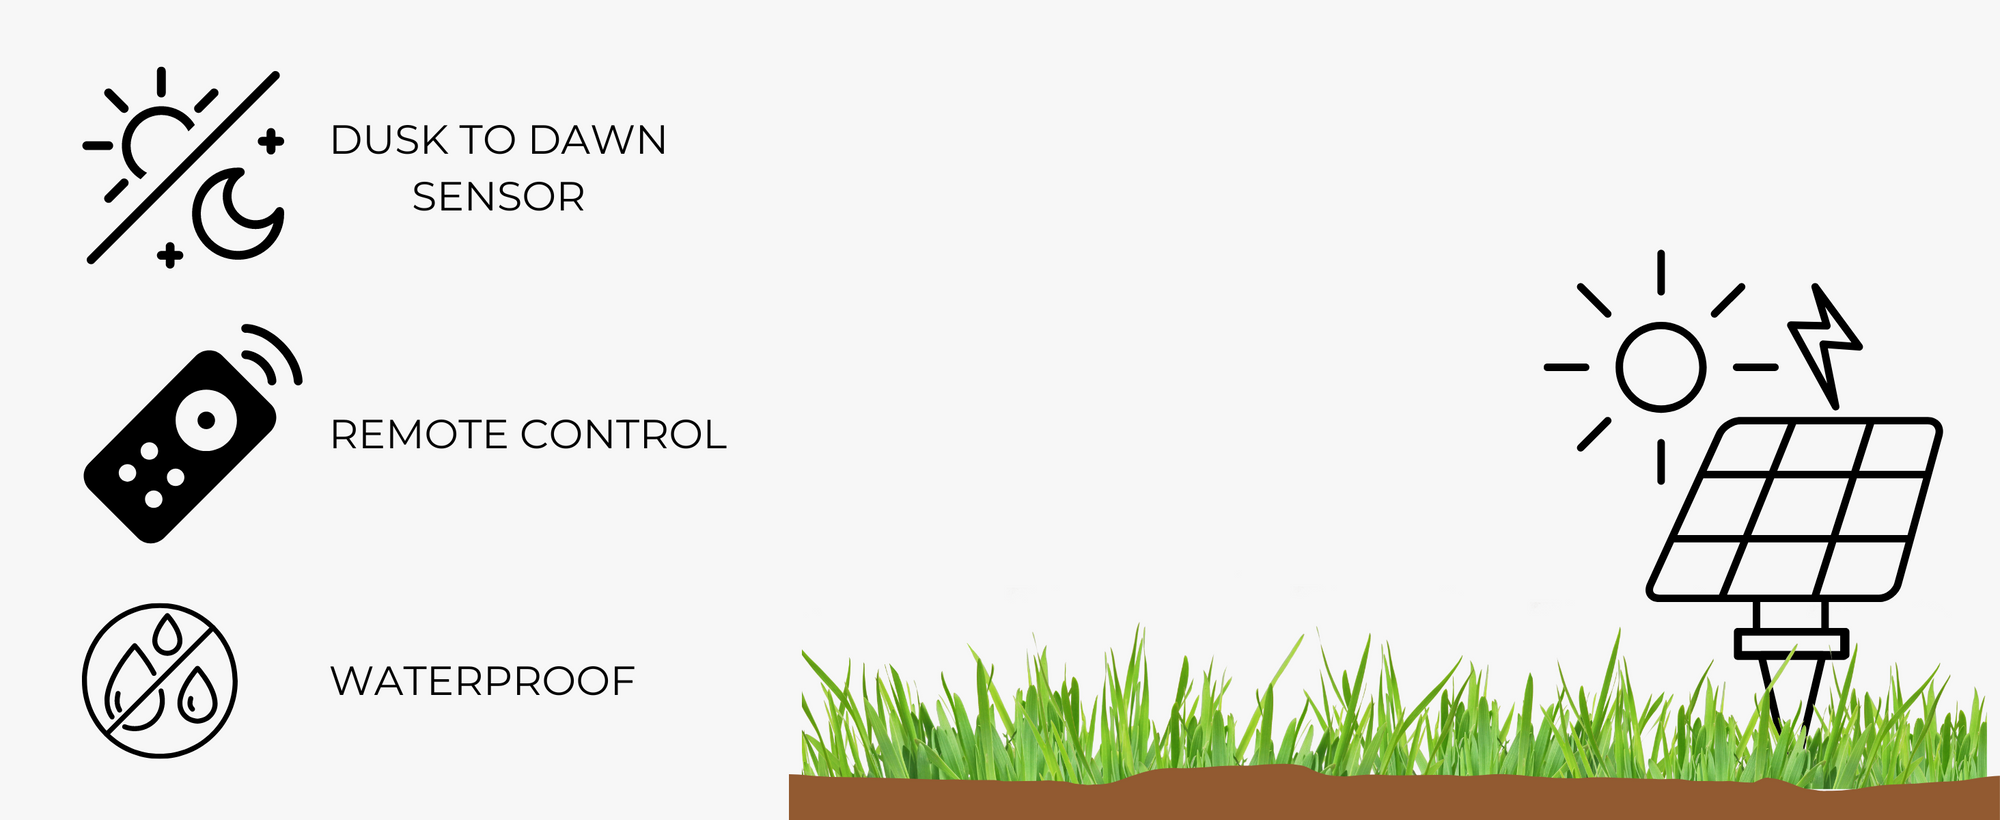
Dusk-to-Dawn Sensor:
Our solar panel system is equipped with a dusk-to-dawn sensor, ensuring your lights automatically turn on when it gets dark and off when daylight returns. This convenient feature means you don’t have to worry about manually operating the lights—they’ll always be ready when needed.
IMPORTANT NOTE
- The dusk-to-dawn sensor only activates in darkness. If the solar panel is in a lighted area or during the daytime, the sensor will not turn on the lights.
- Testing Tip: To test the solar panel during the day or in a lighted area, simply cover the solar panel with a dark-colored object or place it face down to block the sensor. This will simulate darkness and allow the lights to turn on.
- Charging Requirement: For optimal performance, the solar panel needs to receive direct sunlight for at least 5-6 hours each day to fully charge. On cloudy days, the battery may not charge sufficiently, and the lights might not stay on until morning.
REMOTE CONTROL
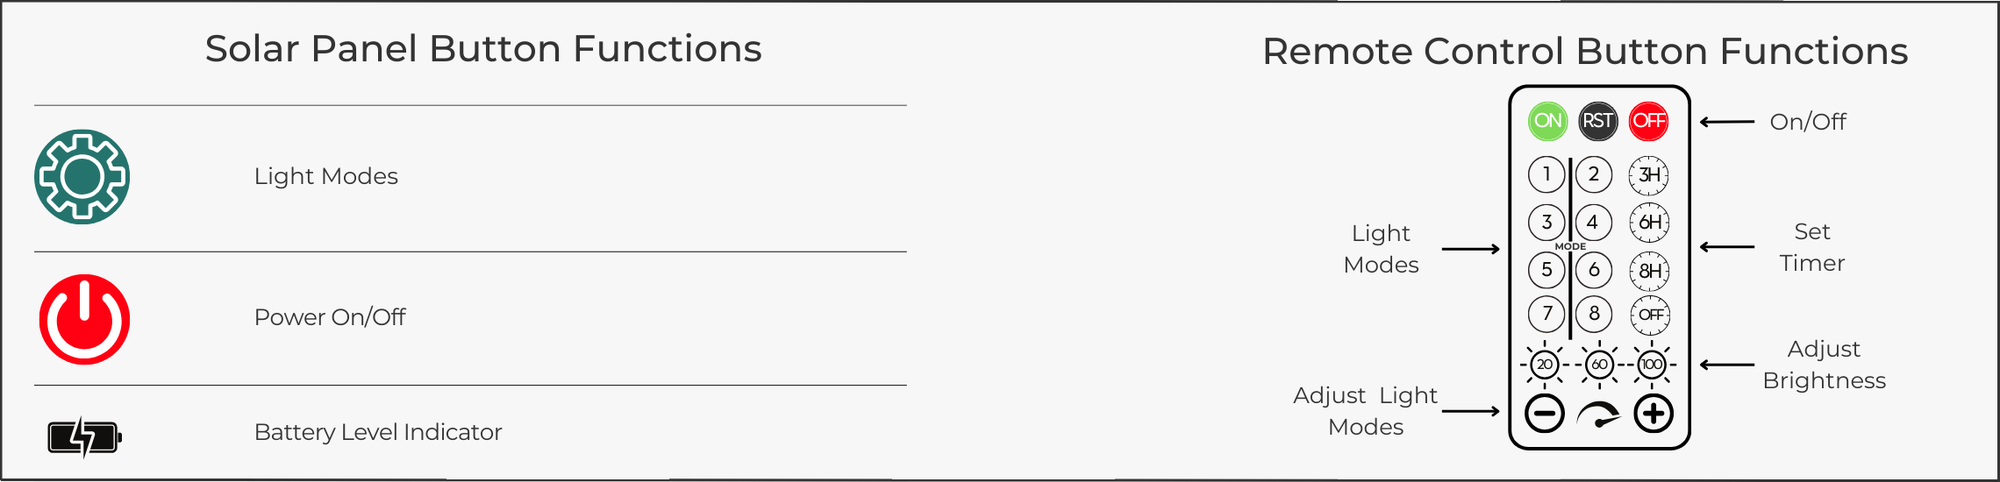
Our solar panel system comes equipped with a convenient remote control, giving you full control over your lighting with just a click. Here’s what you can do with your remote:
- Power On/Off: Easily turn your lights on or off from a distance without needing to access the panel directly.
- Change Light Modes: Switch between different lighting modes to suit your preference or needs. Whether you want a steady glow, a dim light, or a flashing mode, it’s all at your fingertips.
- Adjust Brightness: Customize the brightness level to create the perfect ambiance. Dim the lights for a softer look or increase the brightness for maximum visibility.
- Set a Timer: Program the lights to turn off automatically after a set period, saving energy and ensuring your lights only operate when needed.
Mounting Options
Our solar panel system offers versatile mounting options to suit your needs. It comes with:
- Ground Stake: Use the included stake to easily position the solar panel on the ground. This option is ideal for placing the panel in a garden, lawn, or any other ground-level area where it can receive direct sunlight.
- Mounting Bracket: For more permanent installations, a sturdy mounting bracket is included. You can securely install the solar panel on a wall, roof, or other elevated surfaces. This allows you to optimize the panel’s exposure to sunlight, ensuring maximum efficiency.
Connecting to the LED Transformer Power Source
1: Preparing Wires: Cut wires to the needed length, ensuring enough slack for connections, and strip ½ inch of insulation from each end.
2: Jack Connector Pigtail: To connect your house numbers to the LED transformer, use the provided Female Jack Connector Pigtail that comes with the transformer. Follow these steps to ensure a proper connection:
3: Identify the Wires: For the house numbers the grey wire with a black stripe is positive, and the white wire is negative. For LED transformer the red wire is positive, and the black wire is negative.
4: Making Connections: Connect all the grey wires from the house numbers to the red wire (positive terminal) of the the Female Jack Connector Pigtail. Connect all the white wires from the house numbers to the black wire (negative terminal) of the LED transformer.
5: Secure the Connections: Use wire connectors to securely insulate the connections, ensuring they are stable and protected from any external factors.
6: Connecting the Jack: Plug the Female Jack Connector Pigtail into the Male Jack on the LED transformer to establish the connection.
7: Powering On: Once all the connections are made, plug the adaptor into a power source. Your house numbers will now light up and enhance the visual appeal of your home.
Utilizing the Transformer with Timer and Remote Control
If you selected the transformer option, it includes a timer and remote control for enhanced functionality. Refer to the separate installation manual provided with the transformer to set up and customize the timer settings.
Important Note
If you are not familiar with electrical connections or feel unsure about the installation process, it is recommended to hire a qualified electrician. Your safety is our top priority, and professional assistance can help avoid any potential risks or electrical hazards.
Identify the Wires
Care and Maintenance
Cleaning: Regularly clean the numbers and backboard with a soft, damp cloth. Avoid abrasive cleaners to prevent scratches.
Inspection: Periodically check and tighten any loose components. Ensure waterproofing remains intact.
Troubleshooting
No Light
- Check all connections and power sources for continuity. Ensure the solar panel is not shaded.
- For optimal performance, the solar panel needs to receive direct sunlight for at least 5-6 hours each day to fully charge. On cloudy days, the battery may not charge sufficiently, and the lights might not stay on until morning. Please ensure that your solar panel has received direct sunlight to fully charge.
- Adjust the Panel: If needed, relocate the solar panel to a spot that gets more sunlight throughout the day.
Dusk-to-Dawn Error
- Confirm Darkness: The dusk-to-dawn sensor only activates in the dark. If the panel is in a lighted area or during the daytime, the sensor will not turn on the lights. Ensure that the panel is placed in a sufficiently dark environment at night.
- Test During Daytime: To test the sensor during the day, cover the solar panel with a dark-colored object or place it face down to block the sensor. This should trigger the lights to turn on.
Contact Support
If the issue persists after following these troubleshooting steps, please contact our customer support team for further assistance.